


helloooo. this is the comprehensive guide to using a wiimote (and nunchuk) as a controller for PSU.
this does work as i have been using wii remote for just over a week now
imagine physically chopping away at those damn jarbas
just as a starting note, this will be quite an in depth tutorial to installing and using the wiimote as a controller. And i will be trying to explain some of the techinchal information involved with it. but if your not interested i wil be putting any extra information in italics. and there's pictures!...oh and yes this is a massive guide but it is neccesary
contents
(1)what you will need
(2)getting the wiimote connected
(3)glove pie
(4)ppjoy setup
(5)joytokey
(5)setting up PSU (calibrating the joypad buttons)
(1)
first of all you will need:
[img]http://i20.photobucket.com/albums/b228/dark_rioz/wiimote.jpg[/img]
a bluetooth dongle, nib, reciever thingy
a wii remote and almost definately a nunchuck
i have read reports of a small amount of bluetooth dongles not registering the wiimote and a number of other issues so it is a bit hit and miss. but mine cost £5 and works perfectly
also you will need the following software:
Glove pie carl.kenner.googlepages.com/glovepie_download
ppjoy ppjoy.bossstation.dnsalias.org/and joytokey http://www.electracode.com/4/joy2key...s/jtk374en.zip
(those who have have read SATatami's turbo controller guide should have read about this)
[i] i have scanned all of these files with my virus scanners which are both up to date and there was nothing picked up. i would still advise running a virus scan just incase[/1]
(2)
Right. time to get your pc to pick up and register your wiimote as a bluetooth device.
i would advise you already have a blank page of glovePIE running from the start i will explain this in section 2
i'm using my setup as the guidlines(via windows XP) again it may vary from dongle to dongle
first have your dongle connected
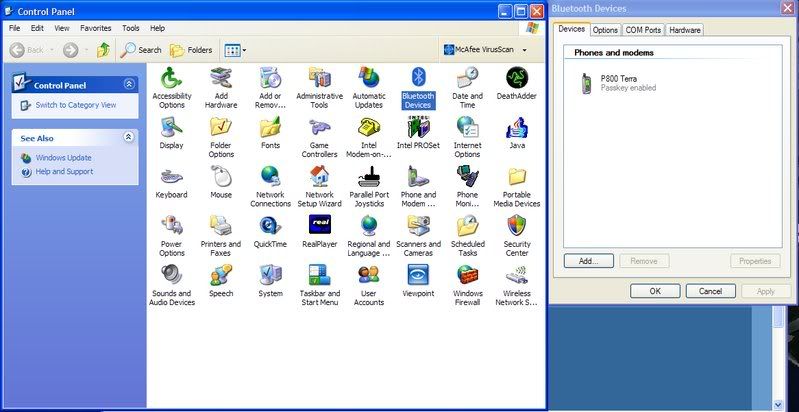
next open up control panel and go to bluetooth devices.
note that there is no device other than my phone at the moment yes i got rid of the wiimote for the tutorial next you'll need your wiimote handy now click add on thebluetooth devices box. this will open another box which will have a tick box saying that your device is ready to be detected.
tick the box and before you click next press 1 and 2 together so your wiimote LED's are flashing. then click next. the pc will scan for a while and then a box will pop up like this:
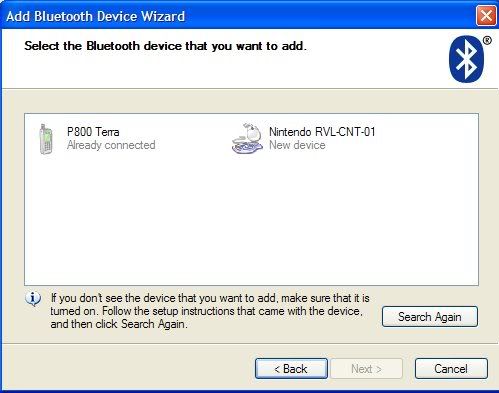
as you can see there will be a device called something along the lines of nintendo RVL-CNT-01. you will probabally need to press 1 and 2 again as it takes a while and it will need to be flashing for the next step.
select the nintendo device. and make sure it is still flashing then click next. now this box it is important you do NOT select a passkey otherwise it will not install. then click next again. the wizard wil think for a second and then say it is installing (or something along those lines)and a speech bubble will appear saying a bluetooth HID (human interface device) has been found. the Wiimotes ligth should still be flashing. and now it is time to use GlovePIE
(2)
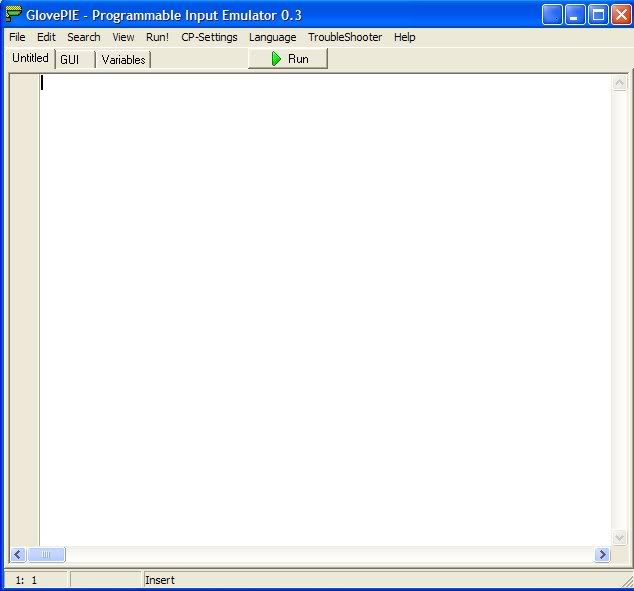
now open up glovePIE
GlovePIE was created and is maintained by Carl Kenner
you should see a blank box like this:
stay in the untitiled tab and copy the statement below and paste (you'll have to use ctrl+v)
//LED SETUP
wiimote1.led1 = true
wiimote1.Led4 = true
then click run. if all has worked your first LED and fourth LED (the one which tells you what player you are) will be lit. someimes the wiimote wii turn off due to inactivity, which unfortuneatley means having to repeat step one
REMEMBER TO CLICK AND UNCLICK RUN THIS IS PRETTY INPORTANT AS YOU CANNOT ENTER CODE WHILE IT IS RUNNING AND YOU CANNOT USE THE WIIMOTE IF IT IS NOT.
before we move on i have to explain the // as there will be lots of them in the main code. basically the // will stop GlovePIE from reading whatever is written after it on that line.. (especially good for noting button conifigs)
now we will setup the buttons so they are read as a joy pad.
(3)
you can now either keep the LED setup or change/add LED's (1-4) to youir preference.
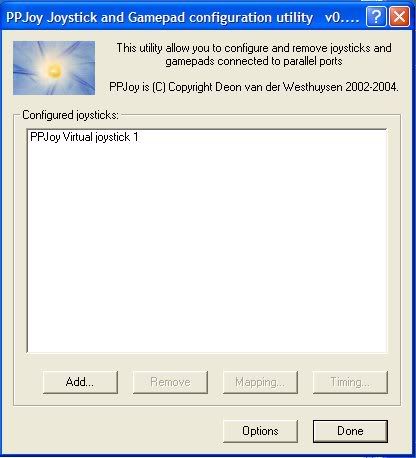
Now goto the CP-settings, and click on ppjoy a box should open looking like this:
without the virtual joystick1
this is what you need to create. to do this click on add.
another box will pop up here you need to go onto the parralel port tab and choose virtual joystick, some of the other boxs will then lock and on the remaining one you should choose controller 1. click done. now choose your virutal joystick 1 and click mapping. put both the buttons onto custom. after this just keep clicking next until it closes.
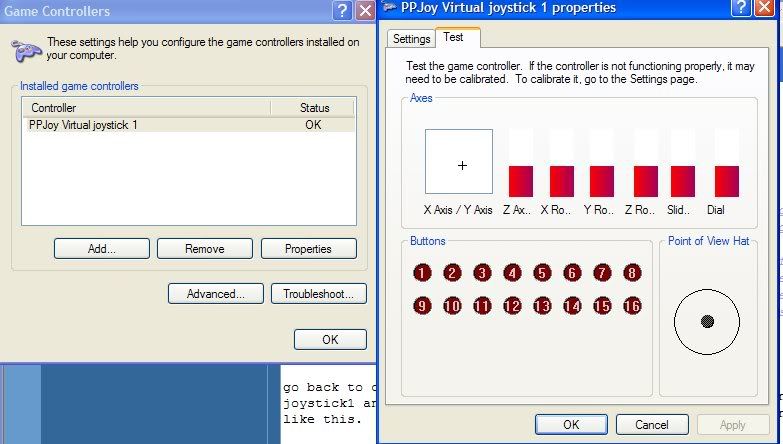
go back to cp settings click joystick select virtual joystick1 and click properties. which should look like this.
you cant do anything with this at the moment, it is just to check the layout looks like that. and dont try to do anything on the other tab as this will acheive nothing and cause trouble.
now to actually programming the wiimote
i will paste down my code. this will have my notes on it and may not be relevant to everyone .. i will explain step by step after.
//LED SETUP
wiimote1.led1 = true
wiimote1.Led4 = true
//ANALOGUE STICK SETUP
PPjoy.analog0 = wiimote.Nunchuk.JoyX
ppjoy.analog1 = wiimote.nunchuk.joyy
//BUTTON CONTROLS
ppjoy1.Digital0 = wiimote1.A //usually digital0 (force(attack ->)) free for hunter)
ppjoy1.Digital1 = wiimote1.B //usually digital1 (force(attack down)) or digital4 (hunter(pallete))
ppjoy1.Digital2 = wiimote1.One //Menu
ppjoy1.Digital3 = wiimote1.Two //Unused (f4)
ppjoy1.Digital4 = wiimote1.Minus //Pallete/backspace
PPjoy1.Digital5 = wiimote.Home //Enter (select)
ppjoy1.Digital6 = wiimote.Plus //Firstperson
ppjoy1.Digital7 = wiimote1.Up //Up
ppjoy1.Digital8 = wiimote1.Left //Left
ppjoy1.Digital9 = wiimote1.Down //down
ppjoy1.Digital10 = wiimote1.Right //Right
ppjoy1.Digital11 = wiimote1.Nunchuk.CButton //lock on/strafe
ppjoy1.Digital12 = wiimote1.Nunchuk.ZButton //alt attack
//SHAKE FUNCTION CLARIFICATION
//WIIMOTE
var.yRot = Wiimote1.RawForceY
var.xRot = Wiimote1.RawForceX
//NUNCHUK
var.NyRot = wiimote1.Nunchuk.RawForceY
var.NxRot = wiimote1.Nunchuk.RawForceX
//WIIMOTE SHAKE BUTTON SETUP
if var.yRot >= 100 then ppjoy1.digital0 = true else ppjoy1.Digital0 = false
//usually digital13 (force)digital0 (hunter)
if var.xRot >= 100 then ppjoy1.Digital0 = true else ppjoy1.Digital0 = false
//usually digital13 (force) digital0 (hunter)
//NUNCHUK SHAKE BUTTON SETUP
if var.NyRot >= 100 then ppjoy1.Digital1 = true else ppjoy1.Digital1 = false
//usually digital15 (force) digital1 (hunter)
if var.NxRot >= 100 then ppjoy1.Digital1 = true else ppjoy1.Digital1 = false
//usually digital15 (force)digital1 (hunter)
again at the begining it is just turning the LED's on.
this just sets up the analogue stick on the nunchuk for movement controls. not much more to be said about this really.//ANALOGUE STICK SETUP
PPjoy.analog0 = wiimote.Nunchuk.JoyX
ppjoy.analog1 = wiimote.nunchuk.joyy
these are all based upon what i prefer for the two classes i use (sorry rangers but hopefully you'll be able to set it up to your own preference)//BUTTON CONTROLS
ppjoy1.Digital0 = wiimote1.A //usually digital0 (force(attack ->)) free for hunter)
ppjoy1.Digital1 = wiimote1.B //usually digital1 (force(attack down)) or digital4 (hunter(pallete))
ppjoy1.Digital2 = wiimote1.One //Menu
ppjoy1.Digital3 = wiimote1.Two //Unused (f4)
ppjoy1.Digital4 = wiimote1.Minus //Pallete/backspace
PPjoy1.Digital5 = wiimote.Home //Enter (select)
ppjoy1.Digital6 = wiimote.Plus //Firstperson
ppjoy1.Digital7 = wiimote1.Up //Up
ppjoy1.Digital8 = wiimote1.Left //Left
ppjoy1.Digital9 = wiimote1.Down //down
ppjoy1.Digital10 = wiimote1.Right //Right
ppjoy1.Digital11 = wiimote1.Nunchuk.CButton //lock on/strafe
ppjoy1.Digital12 = wiimote1.Nunchuk.ZButton //alt attack
these are all the button available on the wiimote and nunchuk. and it says what all the buttons are on every line so just look up what you want each button to do just note (//) what you want that controll to be. this will be inportant for when you apply it to the gamepad setup.
if you want to stop using the shake controls (as i do on my forte techer) just // out the entire area of code stated above.//SHAKE FUNCTION CLARIFICATION
WIIMOTE
var.yRot = Wiimote1.RawForceY
var.xRot = Wiimote1.RawForceX
//NUNCHUK
var.NyRot = wiimote1.Nunchuk.RawForceY
var.NxRot = wiimote1.Nunchuk.RawForceX
//WIIMOTE SHAKE BUTTON SETUP
if var.yRot >= 100 then ppjoy1.digital0 = true else ppjoy1.Digital0 = false
//usually digital13 (force)digital0 (hunter)
if var.xRot >= 100 then ppjoy1.Digital0 = true else ppjoy1.Digital0 = false
//usually digital13 (force) digital0 (hunter)
//NUNCHUK SHAKE BUTTON SETUP
if var.NyRot >= 100 then ppjoy1.Digital1 = true else ppjoy1.Digital1 = false
//usually digital15 (force) digital1 (hunter)
if var.NxRot >= 100 then ppjoy1.Digital1 = true else ppjoy1.Digital1 = false
//usually digital15 (force)digital1 (hunter)
i have both the horizontal and vertial "shakes" set as the same so there arent any mistakes while shaking frantically
this is the clarification of the shake controls for both the romote and nunchuk.
in some of my own comments you'll note i write:
usually digital? (force) digital? (hunter)
digital? being the digital1 phrase with whatever number required
this is basically me changing the controlls from, one class to the other.
for example:
ppjoy1.Digital0 = wiimote1.A
this would be the example for my force setup. say i wanted to use it as the menu i would choose
ppjoy1.Digital2 = wiimote1.A
( i hope i am explaining this well. it may make more sense once you get to the final chapter)
with the shake functions you have to change both the digital? otherwise it will press the button on the false statement unless you shake the controller
once your happy to test all the button are functioning click run. then visit cp settings, joystick. select virtual controller1 and click properties. now. when buttons (shakes also count as buttons) are pressed they will light up. also if you move the analogue stick it will move the little crosshair around.
remember to click run when you try to test this.
REMEMBER TO SAVE (and remember its location)
now we move onto joytokey.
(4)
this is rather straight forward and unfortunatley you will need to go through chapter 5 to get the best use out of it.
all you need to do is open up joytokey. and thats it. for now.
(5)
this is the final step for a basic setup
open up PSU go to options then gamepad settings . if your following my code use the setup below. the bottom two should not be changed.
if your following your own code remember what you noted(or look it up) and the for every digital number assign it to where you want it to go . but rewmember to add 1 to every digital as there is no 0 button.
then start the game up and try it out
After you've done all of that:
everytime you turn your PC on you will need to activate the wiimote (refer to (1))
GlovePIE and RUN your file
and finally JoytoKey.
both of these will move to the list of programs down at the bottom right of the screen (glovePIE by clicking the blank square at the top right and joytoKey by clicking the minimize button)
EXTRA STUFF
finally i'm going to add some extra notes for those who are interested:
the reason that it has to go through such a long winded process is that gameguard will not allow macro functions that GlovePIE can be programmed to do. i have tried this by setting every wiimote button to a keyboard command.
but because using ppjoy changes all the wiimote functions into singular buttons and joytokey will accept only singular button presses gameguard will allow it. and it functions perfectly
if you want to get a more advanced function out of this you can assign unused buttons on the wiimote to keyboard buttons (such as f6).
this is done by going onto joy to key finding the button you want to put this key on by refering to glovePIE(again remembering to add 1 to the digital? number as there is no button0) also to use this function properly you have to make sure is is connected to the appropriate joy pad. you want the virtual joypad1. you can find out which number that is by going to the cp settings in GlovePIE clicking joypad. and wherever it is on that list will deterine it
EG: the top =joypad1
second from top = joypad 2
ect.
ect.
thats all on extras for now.. i'll probabaly update this.
i do apologise for the length but i have tried to make it as simple as possible while making sure all the required information is explained.
also i'm sorry if i havent explained it well, i will look over it myself and see if i can improve it but i have spend 3 hours typing this and i need a break. for now i hope this suffices.
if anyone gets confused by this and wants to set their wiimote up please say and i will try to help
any feedback, comments, cries for help will be appreciated/aided
Edit i've revised some areas and fixed some spelling mistakes
Flick
<font size=-1>[ This Message was edited by: Flick on 2008-03-10 11:54 ]</font>


 Reply With Quote
Connect With Us