
| Quest: | Government Quest 9-5: The Chosen (1/2) |
| Description: | TRescue Rupika. Search for her in the Crater. |
| Client: | Principal |
| Reward: | None |
| Prerequisites: | Government Quest 9-4: Pursuit |
| Overview: | The first portion of this quest takes place in Crater Interior. You can either take
the short or long route to reach the next stage. The short route involves navigating a
cactus maze. The longer route is a little more straight-forward and features more enemies.
For the purposes of this guide, it is assumed you will be taking the long route. After
clearing the last wave on the long route, Ash will appear. Talk to him and take the warp
to the Subterranean Desert. The first Subterranean Desert level is a relatively long level filled with numerous rooms, warps, and enemies. One of the first rooms you will encounter is laden with poisonous gas. You will have to stand on the raised, rocky pads to avoid having your HP drained away. Shortly after that, Kireek will appear. Talk to him and proceed on to the next poisonous room. The difference between this poisonous room and the previous one is that you can stand on a button to temporarily stop the poison. Unfortunately, you have to destroy a bee-hive to gain access to it. Destroying a beehive will cause several bees to appear. These bees can paralyze human and newman characters. Later on in the Subterranean Desert, you will come to a crater-shaped room. Clear the room within 5 minutes and talk to Montague to unlock the "Merissa A room". Also, you will encounter Bernie shortly before the warp to the final room. Before entering the final room, make sure you are well-stocked with supplies. You will be facing numerous enemies in a dark room. Also, if you play through the quest quickly enough, a scene involving Montague will happen shortly before exiting the level's exit warp. RUMOR: It is speculated that there is an increased chance that a Merissa AA will appear in the Merissa A room if you complete the final room in the dark. To help alleviate the obvious problems that darkness can cause, you can stand on the raised, rocky patches to light the room. NOTE: If you proceed through the quest quickly enough, you will be able to watch a scene involving Montague and Elenor. |
| Maps |
 About These Maps About These MapsOn the maps below, the path the player should take is denoted by a red line. Doors and laser fences that are opened by pressing a button are also marked. Please note that switches are represented with circles and fences/doors with ellipsoids. Colors are used to indicate which switch opens which door/fence. Doors/fences that are opened as a result of clearing the room of enemies are not marked. Since it would be impractical to label every single box, a green box is used to denote a group of boxes. Finally, traps, including damage, confuse, slow, and shock, are denoted using a generic Damage Trap icon. Like the box icon, a single trap icon may denote multple traps. |
| Crater Interior |
|
Walkthrough
|
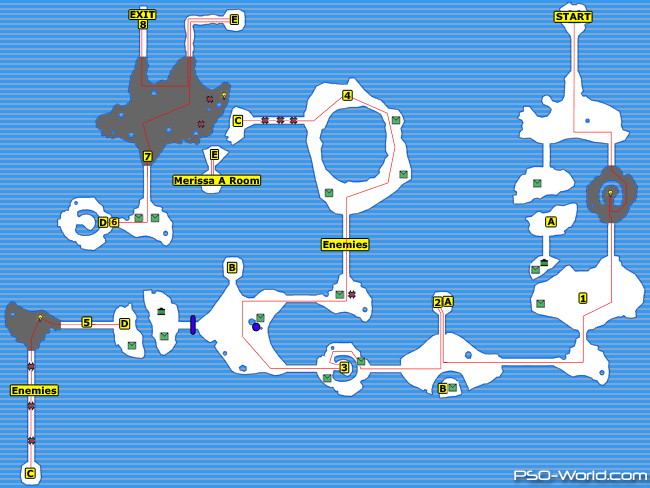
| Subterranean Desert 1 |
|
Walkthrough
|
| Enemy Counts (Crater Interior) |
| Enemy | Grand Total |
| Boota | 12 |
| Ze Boota | 5 |
| Ba Boota | 3 |
| Sand Rappy | 6 |
| Zu | 3 |
| Astark | 5 |
| Satellite Lizard | 12 |
| Yowie | 1 |
| Dorphon | 2 |
| Boxes | 20 |
| Enemy Counts (Subterranean Desert 1) |
| Enemy | Grand Total |
| Goran | 63 |
| Pyro Goran | 20 |
| Goran Detonator | 9 |
| Sand Rappy | 30 |
| Merissa A | 25 |
| Zu | 7 |
| Satellite Lizard | 33 |
| Yowie | 8 |
| Girtablulu | 0 |
| Boxes | 47 |
 Printer Friendly Version
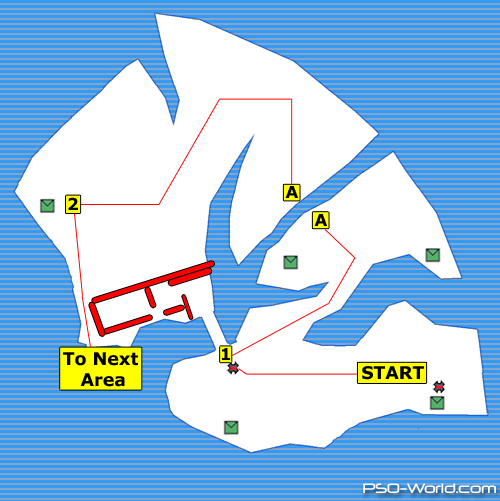
Connect With Us