
| Quest: | Soldier's Pride |
| Description: | Help the army's troops clear the enemies spawning near the Crater. |
| Client: | Principal |
| Reward: | 12,000 meseta (Ultimate) |
| Prerequisites: | None |
| Overview: | Soldier's Pride is the first in a series of
Single-Player Episode 4 quests. This quest has two endings. If you
reach the end within 35 minutes, you will receive the "true" ending.
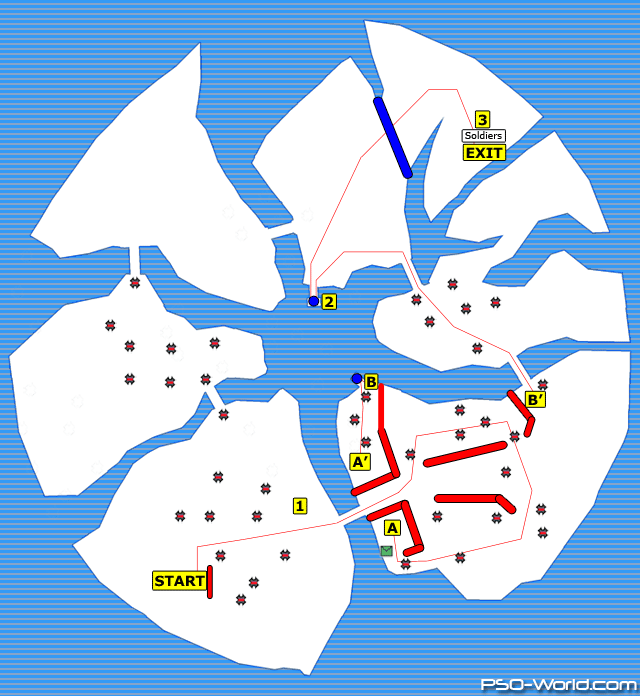
You will need the true ending for the "Pioneer Spirits" quest. After the quest loads, go to the Bank and recruit Ash. After that, head to the Hunter's Guild and collect Bernie. Now take the warp down to Crater South. Once you clear the first room, you will have the option of going West or East. If you go East, you will fight more ground-based enemies. The West route features several Zus. There is a brief cut-scene at the end of each route. Triggering one cut-scene will disable the other. It doesn't matter which path you take to get the true ending. Take the warp to the final room in Crater South, clear the enemies, and move on to Crater Interior. Once you've arrived in Crater Interior, you'll see a cut-scene of an army unit being ambushed by enemies. You need to rescue them to get the true ending. Clear the first room and head east. Activate the switch to raise the barrier. This will give you some extra time to reach soldiers. Continue your way North and eliminate the enemies. After the Northern room has been cleared, press the switch to lower the barrier and go talk to the Soldiers. If both soldiers are present, Rupika will join your party and you will experience the true ending. After that, you can clear the rest of the stage or take the telepipe back to Pioneer 2 to exit the quest. If you decide to take the Western route in Crater Interior, you will only have 25 minutes to save the soldiers compared to the 35 minutes you would have otherwise. This route features several Dorphons. It would probably be best to to clear this route after finishing the quest. Helpful Tips
|
| Maps |
 About This Map About This Map |
| Crater South |
 |
Walkthrough
|
| Crater Interior |
 |
Walkthrough
|
| Enemy Counts |
| Enemy | Crater South | Crater Interior | Total |
| Boota | 19 | 10 | 29 |
| Ze Boota | 3 | 3 | 6 |
| Ba Boota | 6 | 12 | 18 |
| Sand Rappy | 19 | 35 | 54 |
| Zu | 5 | 18 | 23 |
| Astark | 13 | 26 | 39 |
| Satellite Lizard | 17 | 25 | 42 |
| Yowie | 17 | 25 | 42 |
| Dorphon | 1 | 11 | 12 |
| Boxes | 15 | 6 | 21 |
Credit goes to Saffran for providing notes for the quest description, walkthroughs, and maps. Guide compiled by Ryna. |
 Printer Friendly Version
Connect With Us