| Stage 3 Level Maps |
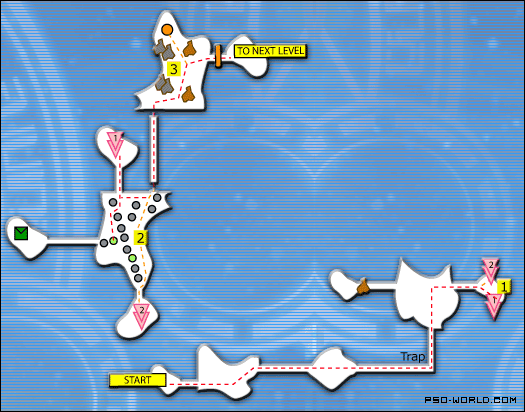
| Area 9 |
|
|
| Walkthrough |
- There are traps in the middle of this room; either have an android
shoot them or avoid walking in the center. The switch undernearth the
moving piston opens and activates the other door/pillar needed to open
the door.
- One player should take the teleporter and get the switch, ignoring
the enemies while doing so. If you're the player getting the switch,
notify the others when you arrive at the locked door so they can activate
the piston switch.
- Ignore the monsters here and shoot the left target; the others are
traps. If you don't have a gun, defeat all the the monsters; the room
that opens up will contain a handgun.
- One player should step on the 3 marked switches; the others are traps.
The others should proceed as the one player deactivates the barriers one at a time.
|
| |
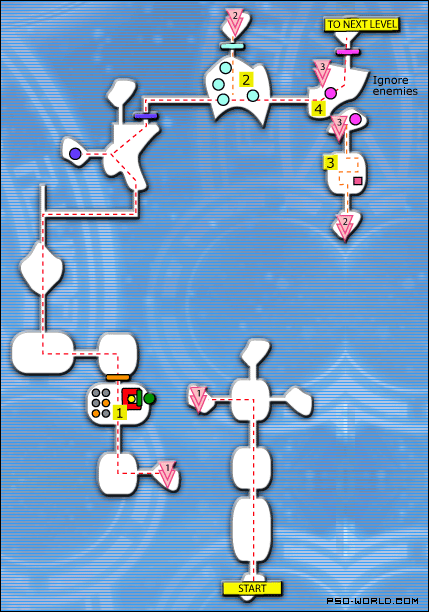
| Area 10 |
|
|
| Walkthrough |
- Head to the teleporter and split up in pairs
- The persons that went through teleporter #1 will have to step on either
one of the correct switches in the room to deactivate the barrier for the other(s).
- Only destroy the right boulders; the others are traps and will hurt
you if you destroy them.
|
| |
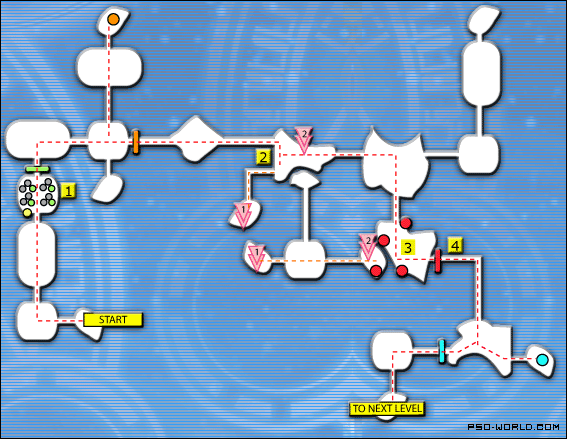
| Area 11 |
|
|
| Walkthrough |
- Two players should get the orange switches here while the other two
activate the yellow and green switches.
- You need to activate 4 switches here. The locations are:
- High upper left corner of the room (need gun) *In offline challenge mode, this switch is next to the bushes, to the right of the door that's opened by activating the 4 switches*
- Middle of the room, slightly to the right, under the rocks that's over the body of water (need gun) *In offline challenge mode, this switches is in the same position, but under water and very easy to see*
- In the bushes to the left of the door that's opened by activating the 4 switches
- Lower left corner of the room, under water, but still accessible by a melee weapon.
After activating the 4 switches, two players should go through the door, while the other two wait in the room.
- One player should stand on the switch, this will deactivate the barrier
and a path of light will appear. The other player should follow the
path of light (going off of it will activate traps) and stand on the
switch). The player standing on the switch should go back once the other
player has cleared the light path room.
- Do not even enter this room until the player in step 3 has gone through
the light path and is standing on the switch. Once that's done, ignore
the enemies and just run over the switch. This will unlock the door
and allow access to the next area.
|
| |
| Area 12 |
|
|
| |
| Area 13 |
|
|
| Walkthrough |
- Two player should get the switch (touch only the right ones) while
the other 2 wait by the door.
- Split up 3:1, with 3 players going through the barrier gate. The solo
player should be the most powerful/experienced, as the next room contains
a few monsters.
- Most of the switches here are traps. The solo player can activate
3 of them, while the others will have to get the last one. The locations
are:
- In the bushes to your left, immediately upon entering the room
- Under water in the upper left corner of the room (accessible by melee
weapon)
- Under water in the lower left corner of the room (accessible by melee
weapon)
- Accessed by other members of team; in the bushes to your right as
you enter the room.
- Right after you activate the 4 switches, there are traps waiting for
you in the corridor.
|


Connect With Us