| Stage 9 Level Maps |
| Area 41 |
|
|
| Walkthrough |
- The Force should drop a Mag here so the others can activate the
light switch in the next area. The Force should take the lower-left
teleport for the boxes while the others take the lower-right teleport.
|
| |
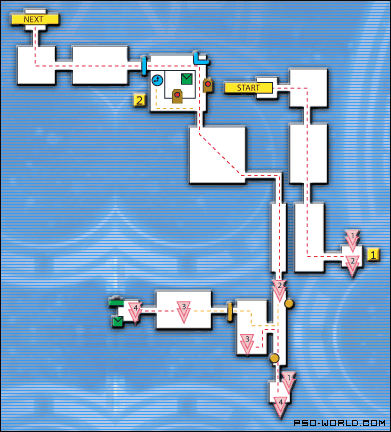
| Area 42 |
|
|
| Walkthrough |
- Ideally, you'll want to have 3 player take the left teleport and 1
take the right. The left teleport will allow faster access to the next
area, while the right one requires that you break through some rubble.
Both sides should step only on the left switches as the right switches
activate traps.
- The teleport transport you to the middle of the room with boxes; however,
taking it will also activate the foie traps present. If you're going
to take the teleport, first destroy the boxes with a gun and then take
the teleport so you'll have a clear shot at the traps.
|
| |
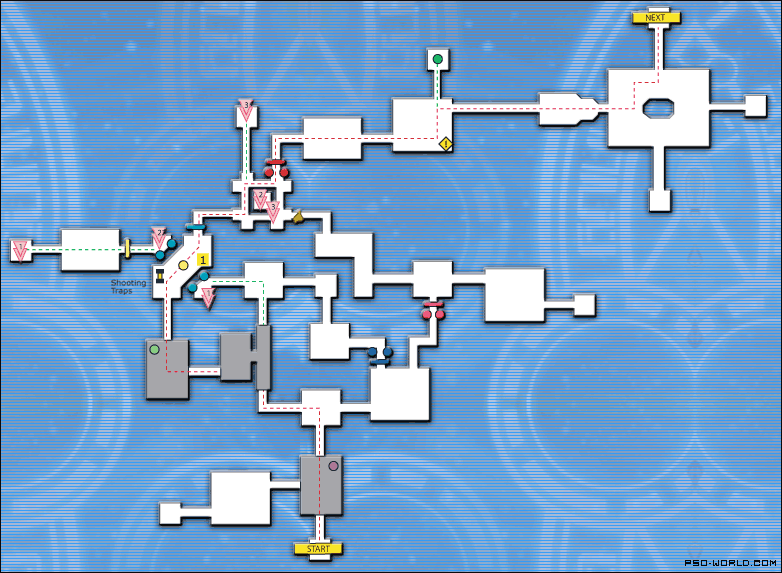
| Area 43 |
|
|
| Walkthrough |
- Stepping on the switch pad here will activate 4 foie traps. Be aware
that a zonde trap will activate once a player activates the fourth
switch. The player standing on the switch pad should move close to
the locked door after the 3rd switch has been activated; this will
put the player out of the zonde trap's range.
|
| |
| Area 44 |
|
|
| Walkthrough |
- 1 player should stand on the switch while a player with a gun should
goes to the west, and 2 the other two go to the east. The player that
went west should go to the east and help the other 2 after activating
the switch.
- You'll hear an error sound when you activate the switch here; ignore
it. Do not activate the other switch as it'll shut off the lights.
- Destroying the boulders will allow access to boxes; be aware that
there are ceiling traps present. The boxes on the central platform are
accessed by clearing the area to the north - It's probably not worth
the trouble.
- There are also a whole lotta foie traps in the west boulder room.
The ceiling trap is in the same area as the boxes between the boulder
are.
|
| |
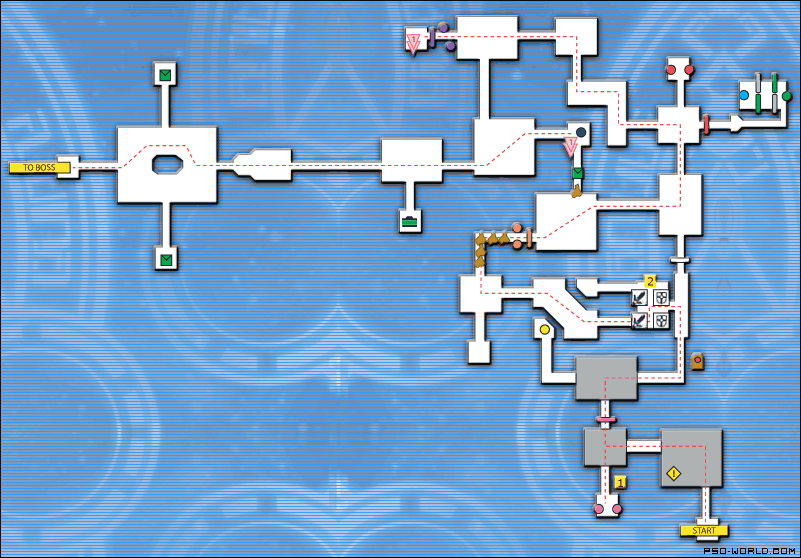
| Area 45 |
|
|
| Walkthrough |
- The yellow dot on the map is a light switch.
- The team has to make a decision here. The four switches here require
a total of 8 weapons and 8 shields. Activating each switch will also
activate foie traps. Getting the required 8 weapons probably won't be
a problem, but the 8 shields may be. Sacrificing a shield that you have
equipped is risky, as Dark Falz can 1-hit kill a Hucast w/o any tech
resistance. If you have the required number of items w/o giving up what
you have equipped, take the shortcut. Otherwise, unless you have a time
of under 30 minutes at this point, it's probably a better idea to pass.
A great time is worth taking the risk, a so-so time isn't.
|


 Printer Friendly Version
Connect With Us