
| Quest: | Government Quest 9-3: Reality & Truth |
| Description: | Secure the Southern route to the Crater. |
| Client: | Principal |
| Reward: | None |
| Prerequisites: | Government Quest 9-2: Data Retrieval |
| Overview: | After clearing the out the first room, you'll have a choice as to whether to take the West or East path. It doesn't really matter which one you start with, you will have to follow both paths. After clearing the first path, you'll take a warp back to the first room. Press the button to deactivate the barriers and take the other path. Once it has been cleared, the barriers blocking the warp to the 2nd Area will deactivate. When the final room has been cleared, Karen will appear. Talk to her and take the warp back to Pioneer 2. This guide will assume that you will take the western route first. NOTE: There is a hidden timer in this quest. If you finish the quest within 15 minutes, you will see a scene involving Black Paper and Leo Grahart. |
| Maps |
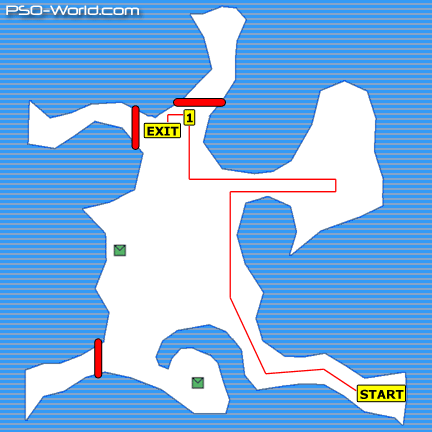
 About These Maps About These MapsOn the maps below, the path the player should take is denoted by a red line. Doors and laser fences that are opened by pressing a button are also marked. Please note that switches are represented with circles and fences/doors with ellipsoids. Colors are used to indicate which switch opens which door/fence. Doors/fences that are opened as a result of clearing the room of enemies are not marked. Since it would be impractical to label every single box, a green box is used to denote a group of boxes. Finally, traps, including damage, confuse, slow, and shock, are denoted using a generic Damage Trap icon. Like the box icon, a single trap icon may denote multple traps. |
| Area 1 |
|
Walkthrough
|
| Area 2 |
|
Walkthrough
|
| Enemy Counts |
| Enemy | Grand Total |
| Boota | 21 |
| Ze Boota | 22 |
| Ba Boota | 50 |
| Sand Rappy | 24 |
| Zu | 13 |
| Astark | 9 |
| Satellite Lizard | 30 |
| Yowie | 4 |
| Dorphon | 1 |
| Boxes | 14 |
 Printer Friendly Version
Connect With Us