


A "Simple" Guide to Affix Transfer
In this guide I will help illustrate the basics of affix transferring. As a side note it WILL destroy the meseta you've saved up. This depends heavily upon you recognizing affixes you want to use and keep, so if you can't read Japanese, refer to this:
Weapon/Armor Affix Translations List
Disclaimer: I'm not made of meseta, so it's not possible for me to test out higher rank affixes and of course the more difficult ones to pick up.
When deciding on what to keep:
1) If you don't know Japanese, just memorize the words of affixes you do want. If nothing else, you can say you can read Japanese, even if it's just パワー.
2) Keep gear with desirable affixes, even if on inferior gear. Gear quality does not matter when it comes to transferring affixes.
3) Bugbear/Kyata Souls are awesome on armor and Vol/Guwana/Ragne Souls on weapons, but they require special circumstances in order to transfer. If you do intend to play around with these special affixes, save every piece.
4) Keep weapons with the same names as the ones you are using, even 0-element ones, as you can use those to buff the element of your main weapon(s).
5) Keep every gear with 1-affix Mutation1 (see Cheating Rank3 Odds with Mutation in the advanced section)
Recommended Affixes IMHO:
Hunter offense: パワー(S-ATK), アーム(Ability), ヴォル・ソール(Vol Soul). グワナ・ソール(Guwana Soul)
Ranger offense: シュート(R-ATK), アーム(Ability), バーン(Burn) or ポイズン(Poison) if you use fast multi-hit PAs like One Point or Speed Rain.
Force offense: テクニック(T-ATK), アーム(Ability), ラグネ・ソール(Ragne Soul)
Defense: ボディ(S-DEF), マインド(T-DEF). ロックベア・ソール(Rockbear Soul) and キャタ・ソール(Kyata Soul), マルモ・ソール(Marmo Soul), ブロウレジスト(Strike Resist) and マインドレジスト(Tech Resist) if you feel a flat reduction might work better.
The Hard Rules of Affixing:
For simplicity I will refer to the target piece of gear as the target, and gear with the traits to be transferred as fodder. I don't have extensive knowledge of the mechanics, so the numbers will be limited.
1) You can only transfer weapon affixes to weapons, and likewise armor to armor.
2) Each piece of fodder must have the same # of affixes as the target. Up to 2 fodder can be applied at once. The exception is if the target has 0 affixes, which can use any fodder but can only apply 1 trait.
3) Adding a new affix (i.e. creating a new slot) suffers an increasingly reduced success chance on all slots attempted based on the number of slots the target has. 0->1 is 80%, 1->2 is 75%, 2->3 is 60% etc.
4) Each rank of affix has a base success rate to directly transfer. However, if more than one item in the pool possesses the same affix, its transfer rate generally increases. Rare-specific affixes such as EXP Boost and Lucky Rise CANNOT BE UNLOCKED OR TRANSFERRED, so you are stuck with the affixes the rare weapon came with should you want to keep those.
Basic Stats - require only 1 affix to unlock
Rank1 : 100% base
Rank2 : 60%/80%/100% base for 1/2/3 identical affixes present
Rank3 : 40%/60%/80%?
Elemental Effects
Rank1: 60%/80%/100%
Rank2: 40%/60%/80%
Rank3: 20%/40?/60?
Mob Souls and Mutation1 are special cases in that at least 2 of the 2-3 gears used must possess the same affix in order to unlock it on the transfer list.
50% = 2 Souls/Mutation present
80% = 3 Souls/Mutation present
5) Upranking requires 2 of the same rank affix in the pool. So on my 0-trait Alba-Grippa, I could use 2 Shoot 2 fodder and have Shoot 3 available with a 30% success rate. Naturally if all 3 weapons have Shoot 2, the Shoot 3 success rate increases (to 50% in this example). Mutation1 can be used in the special case of upranking a 1-affix item from Rank 2 to 3 to increase it's success to 60% (see Cheating Rank3 Odds with Mutation in the advanced section)
An exception to this are Resist affixes, which require all 3 items to have the affix. For example to attain Blow Resist 2, the target and both fodder pieces are required to have at least Blow Resist 1.
Mutation does not seem to uprank.
6) Once you have selected at least one gear to affix, you can opt to use any AC Scratch boost items such as 特殊能力追加(PP) (Add Effect: Spirita Boost). These unlock the quite powerful Boost affixes onto your list, which have a base 100% transfer rate. HOWEVER they are also nerfed by adding extra slots. These items are one-time use, even if the combine fails. Only Spirita Boost (+5PP) and Stamina Boost (+45HP) are available as of now.
7) Success or fail, you will destroy all fodder used and use up a Synthesizer item. You could also very well end up with a 0-affix target gear, as each trait rolls individually.
In this example I will demonstrate how to do a simple 1-2 trait transfer.
First, go talk to Item Lab clerk Dodo, you'll learn to hate him. He hangs out in the main shop area.
Spoiler!
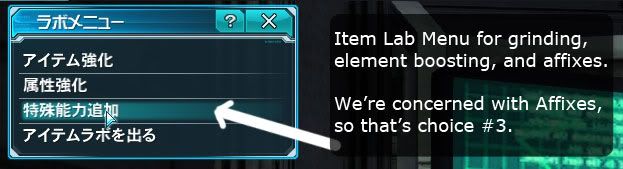
Talking to him pulls up the main menu. The first two options are Grinding, Element Boosting, Affixing, and Exit, respectively. We're here to cut our wrists with broken glass, so pick choice #3.
Spoiler!
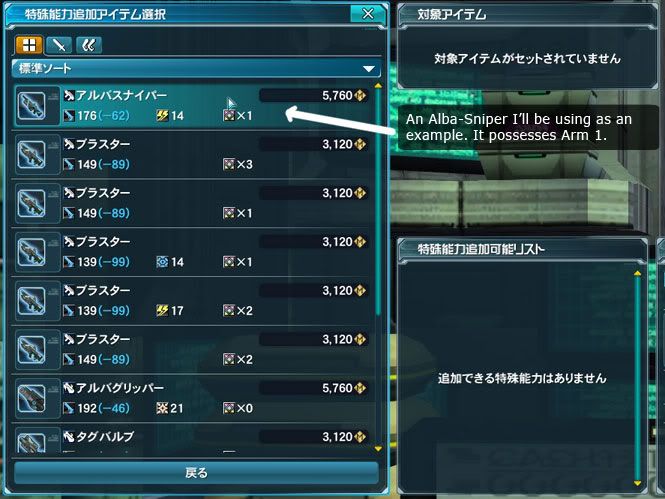
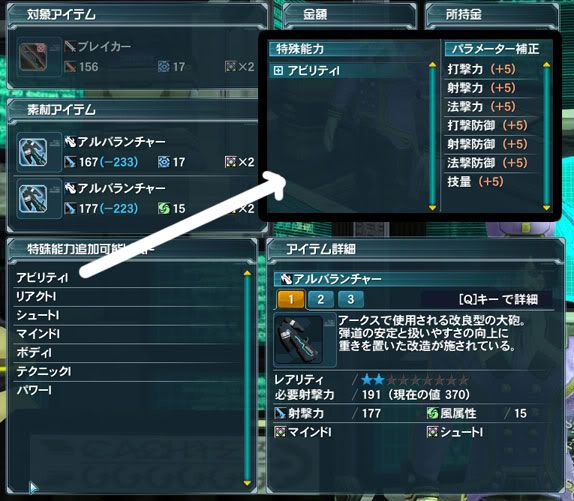
For a TARGET I will use this Alba-Sniper with a single Arm 1 trait. Note all the junk I have in my inventory and their affix numbers. Also when doing this, make sure none of the gear involved is locked, or else it won't show up.
Spoiler!
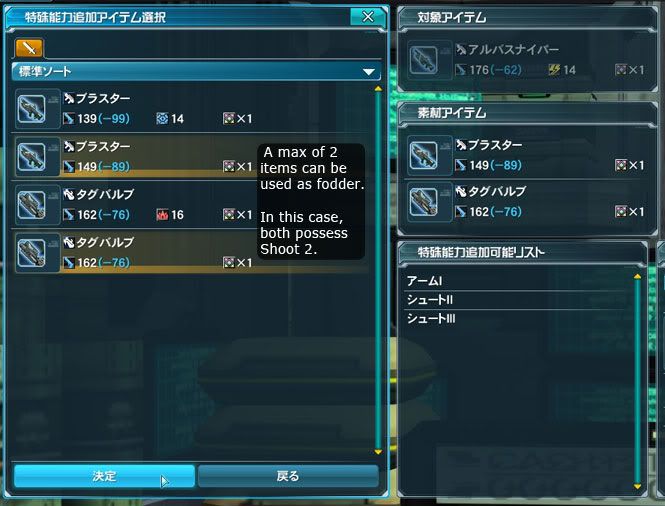
Clicking the Alba-Sniper pulls up a menu with eligible fodder. Note how only 1-trait weapons of various models are shown. I will highlight one Blaster and one Tag Barbu for fodder, both with the Shoot 2 trait. Note how in the Affix Pool I have available Arm 1, Shoot 2, and Shoot 3. Arm 2 and Shoot 2 came from the guns, and Shoot 3 came from upranking. Hitting 決定 (confirm) moves to the next screen.
Spoiler!
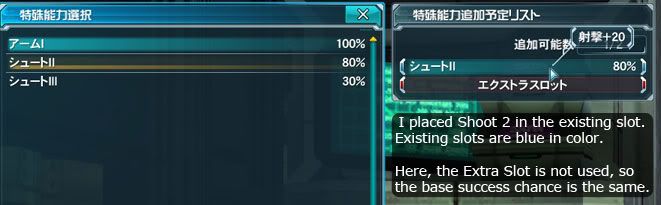
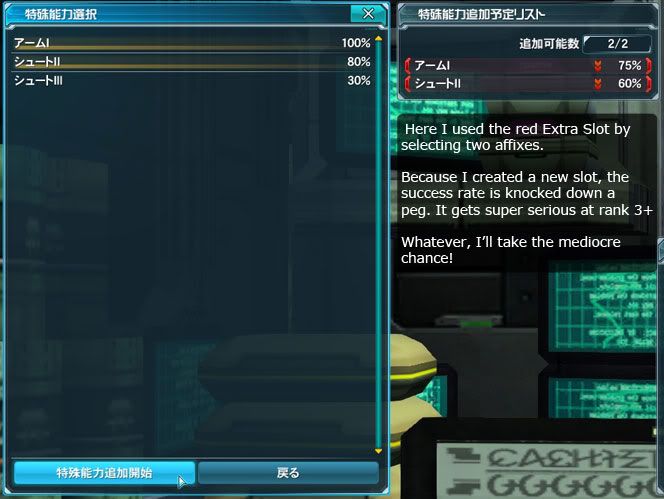
The Affix Pool(left) now shows with the base success rate. In this case Arm 1 has 100% as it is a Rank 1 trait, Shoot 2 has 80% because 2 of those affixes are in the pool, and Shoot 3 has 30% as the base upranking success.
The Slot Window(right) shows 2 slots - 1 pre-existing one on the Alba-Sniper in blue color, and the Extra Slot in red. Highlighting the affixes in the Affix Pool adds or removes the traits from the Slot Window. If I choose only to populate existing slots (e.g. 1 affix as the original target gun had only 1 affix), then the base success remains unchanged.
Spoiler!
If I want to increase the number of affixes for my weapon to have, I'll have to unlock the red Extra Slot. Unlocking this extra slot decreases the success rate of ALL SLOTS... In this case there are 2 slots so both are reduced multiplicatively by 25%. If there were 3, it would be reduced by more.
Spoiler!
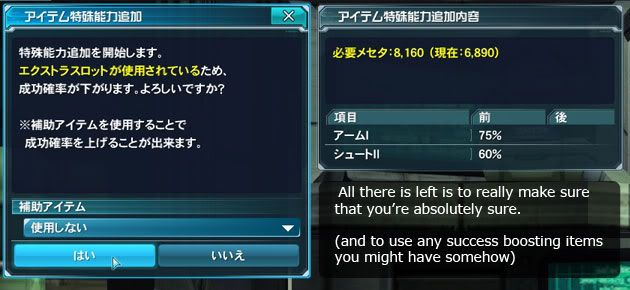
I also don't have enough Meseta but don't mind that...
Clicking the 特殊能力追加開始 (Add Affixes) button leads to the final window where you can use any boost items you might have gotten from Scratch cards, then はい (Yes) to spin the wheel.
Spoiler!
Meanwhile, rub your lucky rabbit foot and hope that the game isn't rigged (I've failed 80% affixing like 12 times in a row now... I mean really). Hopefully this will help people set foot into the world of affix min-maxing, have fun!
Semi-advanced stuff
Planning Ahead
If you have tons of meseta to spend gambling on that perfect affix setup, you can bypass the Extra Slot penalty by planning ahead. Note that this really mathematically change the actual chance of getting said combination, but it can make you feel better about doing that final button press.
For example, let's say I want to create a Leg/DesterenB with React2/Mind2/Body2. Build one from scratch would probably drive me crazy. First I need to find a Leg/DesterenB with 3 pre-existing affixes which is easily searchable on MyShop. It doesn't even need to have affixes I want (if it does, it makes this much easier). Let's say I have one with junk affixes.
Second I need to find 2 3-slot fodder which possess one each of 2x React1 or 1xReact2,2xMind1 or 1xMind2, 2xBody1 or 1xBody2. Since I am relying on the fodder to supply the affix pool, this can get a little crazy. Let's say I find a weak Sub armor with React1/Mind2/Light Resist and a weak Arm with React1/Body2/Spirita.
Throwing those 3 armors into the pot, I can now create up to a 3-slot DesterenB from the pool with no additional penalty, with React1/2 Mind2 Body2 LightResist Spirita (and Ability2, see Compound Affixes below) available, which should be 60%/60%/60% chance on the affixes I want.
Compound Affixes
You may have found Ability (the skill, not the stat... %@%$ whoever decided to translate it Ability as the norm) on higher level pieces of kit, but you can actually make them yourself. I have tested this personally with Ability 1 and 2.
You will need 3 affixes between the 2-3 gear pieces you will use. If you want to make Ability, you will need a combination of Power/Shoot/Technic OR Body/React/Mind. The component affixes must be at least the same rank of the compound affix you wish to make. With at least these three stat affixes in the pool, Ability should unlock. As an compound, its success rate is 80% at rank 1, but transfers at 100%. Ability2 is 69% compound, but transfers at 20%. As for upranking Ability itself, it appears to require 3 of the same Ability affix in the pool.
Spoiler!
Cheating Rank3 Odds with Mutation
Mutation1 is all that is available in OpenB, so that's what I'll talk about. Currently it's not uprankable, and higher ranks don't seem to drop yet.
Mutation1 buffs upranking success rates on 1-affix gear to 60% until rank 3. What the hell does this mean, Jey? Well, lemme tell you what this means. It means a 300% increased chance of upranking Burn2 to Burn3, or 200% increased chance to uprank Technic2 to Technic3.
Shoot1+Shoot1=Shoot2 @60% success
Shoot1+Shoot1+Mutation1=Shoot2 @60% success
Shoot2+Shoot2=Shoot3 @30% success
Shoot2+Shoot2+Mutation1=Shoot3 @60% success
Burn2+Burn2=Burn3 @ 20% success
Burn2+Burn2+Mutation1=Burn3 @60% success
Poison3+Poison3=Poison4 is not buffed by Mutation1 (it stays at 20%) and could require a higher rank of Mutation, who knows.
It does not increase success of direct transfers of Souls etc. or previously-upranked stats.
Cheating the odds with Souls
Elemental weapon affixes were nerfed at game release, but it has come to my attention that certain souls buff success rates of specific affix lines.
Vol Soul -> Burn
Burn II + Burn II + Vol Soul = Burn III@50% (normally 20%)
Burn II + Vol Soul = 40% direct transfer of Burn II (no change)
Guwana Soul -> Poison
Poison III + Poison III + Guwana Soul = Poison IV@40% (normally 20%)
Poison III + Guwana Soul = 80% direct transfer rate (normally 20%)
Marmo Soul -> Freeze
Mizer Soul -> Shoot
Shoot II + Shoot II + Mizer Soul = Shoot III@50% (normally 30%)
Shoot III + Shoot III + Mizer Soul = Shoot IV@40% (normally 20%)
Shoot III + Mizer Soul = 80% direct transfer rate of Shoot III (normally 60%)
My data is limited to the gear I have on hand, but a few things are obvious:
1) Mutation I upranking is superior going from 2xRank II -> Rank III
2) Souls are completely superior for transferring Rank III affixes
3) Souls are effective at buffing success of 2xRank III -> Rank IV
Rappy Soul : Light Resist / Spirita
Rockbear Soul : Mind / Blow Resist
Kyata Soul : Flame Resist
Vol Soul : Burn / Arm
Ragne Soul : React / Gloom Resist
Guwana Soul : Poison
Mizer Soul : Shoot
Vadar Soul: Shot Resist / Wind Resist
Signo Soul :
Snow Soul : Body / Ice Resist
Marmo Soul: Freeze / Stamina
Fang Soul : Shock / Power
7/23/12 Souls boosting stuff, really need to rewrite this
7/7/12 AC Scratch item use, rare weapon affix clarification, I really should just categorize this ... not so simple anymore.
6/25/12 Updated w/ Soul transfer + Resist upranking corrections thanks Eyce_Theon! Compound affix clarification
6/30/12 Mutation not uprankable
7/1/12 Mutation1 use + some 8am editing
7/4/12 added Marmo Soul


 Reply With Quote


Connect With Us